- Database
- Zones
- Desert of Flames
- The Court of Al'Afaz
The Court of Al'Afaz
| Level | 50 - 60 |
|---|---|
| Type | Instanced Indoor |
| Expansion | Desert of Flames |
|
| ||||||||||||
| ||||||||||||
| Contents [hide] |
General information
To enter The Court of Al'Afaz everyone must hail Walheed Raffini. He is located up on the hill just outside the cavern to Shimmering Citadel/The Court of Al'Afaz.
Your faction with Al'Afaz Court will drop only by kills of named mobs in towers. Eventually, all mobs in zone will become KoS as your faction drops. Approximately 8 full clearings of this zone will make you KoS, just watch your faction on your Persona tab. Becoming KoS makes some of the pulls more interesting, but nothing that will prevent you from doing the zone. Currently not known what improves that faction.
Revive inside zone possible, by zone-in. Re-entry is 6 days. Every kill of named gives decent amount of guild level exp. Majority of drops are no-trade, class specific, bring shamans and bards since lots drops for them here.
There is one nasty bug in this zone. Your raid fellows cant be seen some times. Hence time by time you are able to see only 4 ppl out of 24. It is possible to correct it if invisible player casts some illusion spell or affected players changes SOGA models on/off.
NOTE: Evacing takes you OUTSIDE the zone and you will not be able to get back in.
Dungeon on the way to lift
By zone-in/revive
After first jump by zone-in, there is NPC called The Keeper of the City Keys. He is a djinn like mob on right-hand side. To turn him aggro, pull tclose by froglok gardeners. After encounter resets, he stays attackable. Best seems to disband one person from raid, get him naked, turn djinn aggro, let player die. Pull then can be done as with regular mob no need to bother with 5x froglok. It may be also good idea to save this mob as the last one, to save armor condition decrease by accident deaths for other mobs, since this one stands right next to revive point.
Proceed to the left lift, all mobs are non-aggro, no need to kill them. Way to lift from zone-in roughly: Drop down behind the mirror (climbable wall) and pretty much go straight forwards. That'll take you to the lift.
Lift-up (left)
Just to the left of the cavern entrance when you see the lift, is a wiseman. He comes with friends. If you step on the lift, not only will you aggro The Prismatic Captain, but you'll also get all the mobs around the lift AND the wiseman. Therefore, it is better to pull the wiseman and his friends around the lift before tackling this particular named.
Once the trash is dead, you can safely pull The Prismatic Captain. The best idea is to have your entire raid force standing on the rock where the wiseman was hiding, and the tank pull to the wall opposite the raid force. Your MT should have their back to the wall, but other than potential AOE's, this guy is a pushover.
After killing the Prismatic Captain, you take the lift up to the first tower. Be aware of your faction! If you are KoS to mobs in the zone, you will be attacked IMMEDIATELY when the elevator arrives at the top.
Garden Areas
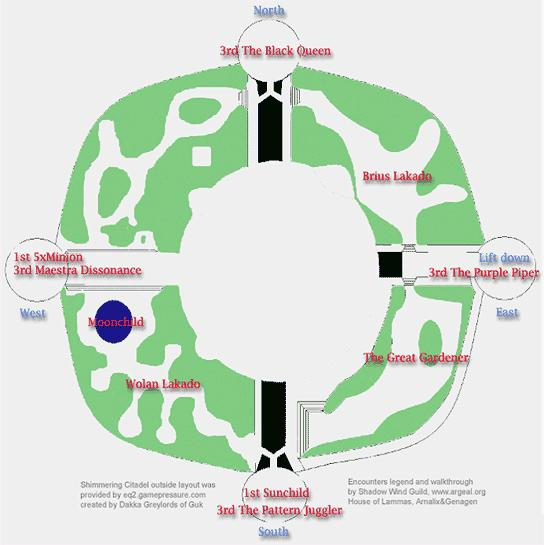
Lift arrives in East Tower, 1st Floor.
North-East area, Brius Lakado walks between North and East towers. North-West area, Nothing interesting in there. South-East area, The Great Gardener static encounter on island-like garden piece. South-West area, Wolan Lakado walks between South and West towers. Moonchild encounter in middle of water fountain.
All of the above areas also have Green Gardener's in them. Be aware of this if you have people in your raid force whom are aggro. The strats for the named are as follows:
Brius Lakado
Nothing particularly special about this guy. Just have your tank turn him away from the raid and everyone else go full burn. He has no AOE's to be worried about, fear or knockback. Pretty much just a spank and tank. You need the Epitaph of Brius Lakado from this guy so that The Pattern Juggler doesn't spawn hundreds of adds.
Wolan Lakado
Nothing particularly special about this guy either. Just have your tank turn him away from the raid and everyone else go full burn. He has no AOE's to be worried about, fear or knockback. Pretty much just a spank and tank like his brother.
The Great Gardener
Now, this guy can be nasty for an unprepared, and poorly geared raid-force. Your best bet is to have the tank put his back against the island that The Great Gardener is on. That means the mob will be facing the island, while your tank will be facing the steps. He has a nasty noxious AOE, so all casters need to be max range. Melee can either throw noxious resist gear on and eat the AOE, or joust it. He also comes with approx 4 adds. If your raid force is mostly 60, have a Main Assist target the adds so the DPS can burn them down. Otherwise, just AOE them to death.
Moonchild
Very, very nasty. Firstly, before you pull this guy, have a monk/bruiser/SK/necro drop raid, throw something at the mob to aggro and then feign death. Everyone else in the raid must be OFF the path and somewhere in the gardens. I recommend on the West Tower side against the wall. 3 Ghosts of Dusk will spawn and head off to the South Tower and spawn the Sunchild. Once they have ran off, re-invite your member, wait for these to come back and kill them.
Now, have 1 tank pull the Moonchild and tank them exactly where she is. Have a second tank stand in the path that the ghosts ran down. Once Moonchild is pulled, the ghosts will spawn again. It is VERY important your second tank is on the ball and catches these mobs, otherwise they will bring Sunchild into the fight. All raid DPS will burn down these heroic adds, then everyone will focus on Moonchild. This mob has a very nasty cold AOE, and I believe can also single-target stun your tank. All casters must remain max cast distance, and all melee DPS must joust the AOE... or have a very good cold resist and just eat it.
Towers
Listed in order from easiest to toughest.
East Tower
1st floor 5x 62x4+++ lateman
2nd floor empty
3rd floor The Purple Piper
This named is pretty easy to deal with. Just have your MT rush the mob, turn it and tank with his back to the wall. The rest of the raid should be around the elevator area, or just in-front of it. There are no major AOE's to worry about, so your melee DPS can just charge in and burn the mob down.
West Tower
1st floor 5x Orchestral Minion - Aggro, do not walk inside too far, can be mezzed.
2nd floor empty
3rd floor Maestra of Dissonance
The Maestra of Dissonance comes with 2 adds that can be mezzed. If your raid force is around 60, without mentoring, then get these under control and have your MA target them separately so the raid can burn them down as quickly as possible. After that, go to the named. All three of these mobs are bards and pretty easy to deal with. Just burn them fast and they're pretty much a tank and spank scenario.
South Tower
1st floor nothing/Sunchild - Spawns with Moonchild encounter NOTE! : the adds of Moonchild must get to Sunchild for him to pop so best to send one person in out of raid engaige, die then reinvite, then kill adds and proceed as normal.
2nd floor empty
3rd floor The Pattern Juggler - Starts ring event if not given epitaph fast. Epitaph is dropped by Brius Lakado.
Sunchild is a tougher version of the Moonchild. You need 2 tanks for this encounter. Have them tank the Sunchild exactly where it is and the rest of your raid at max casting distance. This guy uses a heat AOE rather than cold, so make sure your melee DPS have a good heat resist, or are prepared to joust the AOE. The major difference with the Sunchild is that it memwipes. This is why you want 2 tanks. Your entire raid need to be targeting the mob, which means healers will heal through the mob. Once the memwipe hits, they need to run towards the tank if the named is targeting them for one of the tanks to rescue it off. Then, when the next memwipe hits, the other tank will hit rescue. You shouldn't need more than 2 rescues to take down this guy.
The Pattern Juggler is an interesting fight. He'll start off as an NPC and the MT should have the epitaph from earlier. Simply approach the mob, right-click to show the epitaph and proceed to kill him. He will aggro a random person in the raid, which usually seems to be a healer. Once he's aggro, a non-curable detrimental effect will pop up called "Curse of Madness". What this will do, is everytime you use an ability or spell, you have a chance to instantly die. This chance relates to how much power you have left. For example, with 40 percent power left, everytime you use a spell or ability, you've a 60 percent chance of dying. So, power management and power regen are key. Have your MT with their back to the wall as normal and just burn this guy down as quick as possible. He doesn't have any other special abilities.
North Tower
Lift starts to operate once you kill the named in the other 3 towers
1st floor empty
2nd floor empty
3rd floor hailing or getting close to The Black Queen spawns The Fire Witch
The Fire Witch will spawn if you get close to The Black Queen or hail her. Essentially, this fight is a tougher version of the Sunchild. So, have your raid on the left side of the room close to the elevator, with the tank on the right side in the corner near The Black Queen. The main thing to remember here is that The Black Queen will aggro pretty soon after this mob dies. Be very careful with your power. The reason for this will be evident in the strat below.
Next, you need to deal with The Black Queen. She is essentially the same fight as The Pattern Juggler, with one noticeable difference. She randomly picks a person in the raid and will teleport them. How often this happens seems to be pretty random as well. If someone is teleported, have them call it out in raid chat and make their way back to the North Tower as quick as possible. Obviously, if she does this to your MT, you have a major problem. What will happen then, is she'll chase him down, kill him and then come back for your raid. Considering she has the same power curse as The Pattern Juggler, you can use this time to get some power back and have your OT get ready to pick her up on return. Her adds are easy to deal with, so just AOE them to death.
If you survive both of these fights, congratulations on finishing courts and getting some nice status for your guild.
Other Information
Status points: The Purple Piper, The Pattern Juggler, Maestra of Dissonance, Moonchild, The Fire Witch and The Black Queen
Faction hits: The Purple Piper, The Pattern Juggler, Maestra of Dissonance, The Keeper of the City Keys
-Your faction standing with The Court of Al'Afaz got worse.-
|