Understanding the Arts
This guide is intended to assist new Artisans with one of the more complex aspects of the Everquest 2 Tradeskill System: understanding one's Skills and Arts and applying them successfully to your profession. This guide has been rewritten for the post-Kunark Tradeskill Arts.
| Contents [hide] |
What are Tradeskill Arts?
The Tradeskill Arts are spell-like powers which enhance your ability to make crafted items. Every Artisan class and subclass has a unique set Arts. These Arts serve three purposes: to enhance your crafting, to counter bad events that happen during the crafting process, and to successfully respond to rare crafting events. Arts are also referred to as Counters (because they counter events).
There are two types of Arts: those that enhance Durability, and those that enhance Progress. You receive six new arts every 20 levels (as of this writing, at levels 1, 20, 40, and 60). These arts automatically upgrade, and when they do the old versions of these arts are no longer available.
A Note on Skills
Skill refers to the Technique each profession uses, such as Fletching (Woodworkers) and Artistry (Provisioners). You can see your Skill level and cap by pressing 'L' and clicking the Tradeskill tab. Your skill cap raises 5 points each level. Most races have an option to enhance certain tradeskill skills as part of their class choices as they level up. Skill is passive, but helps determine the difficulty of recipes.
Letting your Skill level slip too far below your Skill cap will eventually hinder your ability to achieve Pristine results. Just like combat and spell-casting skills, you need to use them to keep them up. Before the Arts revamp, to get crafting skillup reguarly required using non-grey arts, and it was possible for your skill to fall well below your cap and cause you issues achieving Pristine.
Skillups are still tied to using your arts, so it's theoretically possible for your skills to slip (perhaps if you never used an Art). If you are using your Arts regularly you should have no problem keeping your skill at or near its cap. If you find it's slipped, try hitting three arts every round for one or two combines, it should catch up quickly.
The Technical Bit
If you examine your Arts, you will see that there are six Arts, three which affect Progress and three which affect durability. These have varying affects on the crafting process. These are usually described in terms of +/-; for example, + Durability/- Progress. Let's look at some Tier 1 Arts (note: these pictures are from before the Rise of Kunark arts revamp, but work well enough as illustrations):
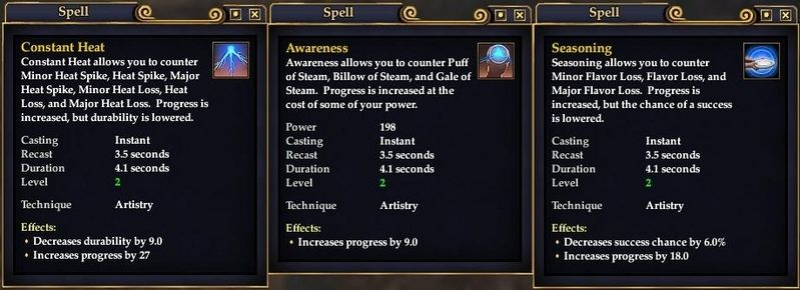
So, from left to right, the first art is + Progress / - Durability. The Second is + Progress / - Power. The Third is + Progress / - % Chance of Success.
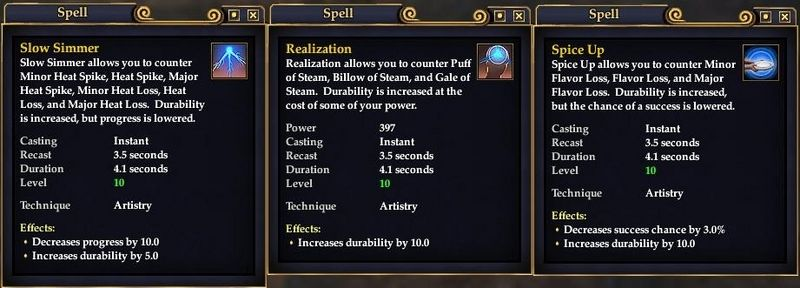
These are + Durability / - Progress, + Durability / Power, and + Durability / - % Chance of Success.
The Actual Process
So, you've gathered together your recipe books, all your ingredients, you step up to the crafting table, pick your recipe and click Start. Now what?
Every crafting session is composed of multiple 'rounds'. Each round is just long enough to use three Arts if you're coordinated, and at the end of each round numbers will float up from the crafting station to show you how you did. A normal round with no events and no Arts used results in -10 Durability / + 50 Progress (indicated by the numbers that float up from the crafting table). But there is a random element to crafting which determines how each round will go. You might also see -50 / +0, or +100 / +100, even with no Events to counter. And even if you have no Events to counter and every round is -10 / + 50, there's a possibility that you will not create a Pristine item. Why? Because there's only so much Durability to start with.
The trick is to manipulate your Arts to keep your Durability up (so the 4th bar is still showing) while keeping the Progress moving.
Countering Events
Every now and then you'll see an icon pop up on your crafting interface. This is a crafting event, and you must counter it to avoid negative results in the round. When you see an event, counter it by choosing an Art with the same icon next. If you choose an Art with a different icon you will "fail to counter" and see negative results in that round.
According to Domino at the Mechanically Speaking panel during SOE Fan Faire 2007, the longer you've gone without an event to counter, the more likely you are to get one.
Hotbars and the Tradeskill Arts
With Rise of Kunark the crafting creation window was modified so that all your current crafting arts automatically appear there. If you right click them you will get a hotbar menu allowing you to lock them and turn off tool tips. In this window the arts are automatically tied to your 1-2-3-4-5-6 number pad keys. You can, of course, use your mouse.
If you hate your num pad, your arts are also in your Knowledge book and can be dragged to a regular hotbar.
Many people like to arrange their arts so that slots 1-2-3 are for Durability and 4-5-6 are for Progress. It doesn't matter what order they are in as long as you are comfortable with it.
Applying Your Tradeskill Arts
First, let me say this loud and clear: while there are definitely some wrong ways to use your Arts, there are lots of right ways to use them. Fierce debate has occurred when Tradeskillers are enamored of their particular crafting technique. As long as you are happy with whatever method you come up with you're fine!
Be Proactive, Not Reactive
This is the number one Wrong Way to use your Arts: only using them when an event comes up to counter. Those Arts can affect your round, so apply them to your tradeskilling in a proactive way. Like extra Durability? Use your Durability Arts to pump it up. Want to push Progress as fast as you can? Go for it with those Progress Arts.
Is it that easy? Not necessarily. Using all Durability Arts slows Progress down painfully. Using all Progress Arts can cause you to lose too much Durability to hit Pristine. The trick here is finding a balance of Durability and Progress Arts that keep the session moving at a decent rate while never sacrificing so much Durability that you cannot achieve Pristine quality. Look at the results of various arts and experiment a little. You'll find combinations that, during a normal round, give you quite satisfactory results, boosting Progress with little or no loss of Durability.
When mucking about with your Arts, remember:
- You cannot use two Arts with the same icon at the same time.
- A "round" is four seconds; you have time to use three Arts during one round.
- All classes are unique: a system that works with one Profession might not be as effective with other Professions.
There are many valid combinations of Arts that work beautifully for this. Some crafters prefer a minimalist approach, using as few Arts as possible, while others endorse the 'spam' method of hitting lots of Art buttons all the time, and between those extremes is a lot of middle ground. Finding your own system is part of the fun of tradeskills. Remember to re-examine your Arts from time to time as you level up, especially if you suddenly start struggling to get Pristine.
The Difference Between the Archtypes
To avoid "cookie cutter" arts, when the Tradeskill Arts were revamped they worked in differences between the Archtypes (Scholar, Craftsman, and Outfitter)
- Craftsmen tend to be more efficient at gaining progress
- Outfitters tend to have better durability gains
- Scholars are more power-efficient and have slightly better success chances
- Also, race has no affect on your crafting unless you have chosen a racial skill that affects your crafting skill.
Experimentation Arts
The Experimentation Reaction Arts. Click for a bigger picture.
Experimentation is extremely difficult and failure will cost you the item you're experimenting on. We recommend you review Be Proactive, Not Reactive above, and be sure to learn what each individual Art does. We were able to use two to four Experimentation Arts per round. Don't craft on autopilot and be sure to counter any events!
Crafting and Power
Before the Rise of Kunark Arts revamp, tradeskill arts were notorious for burning power like mad. Many tricks were used to keep power up, such as crafting nekkid, grouping with bards and enchanters, mentoring down, and mass consumption of drink and totems.
These days crafters are hard-pressed to run out of power, but in case you are having problems, here's the pre-Kunark crafting power advice:
Because your power pool is based on your Adventure level and your equipment, and because you can be any level Adventurer and any level Artisan at the same time, the Arts which use power use a percentage of your power pool rather than a fixed number. To demonstrate this, put on all your best gear and check how much power that Art uses. Now take it off and examine the Art again. At higher levels you can really see the difference. The power-using Arts at different Tiers will use varying percentages of your power pool.Nonetheless, it's still a percentage. Any particular Art will always eat the same percentage no matter what your power pool is. So what you adjust is either your power regeneration rate (to recover the power faster) or how often you use your power Arts (use the power slower). However you do it, you definitely want to make sure you don't run out of power, in case you have to counter an event with an Art that uses power or that elusive rare event comes up. Here are several strategies:
- Stock up on crafted drink appropriate to your Adventure level for good power regeneration.
- Adjust your crafting routine to regularly use Arts which take less power.
- Use level-appropriate power regenerating totems (made by Woodworkers) for extra power regeneration.
- If you are of an appropriate class, use power-regenerating songs, spells, and pet taps (please remember to park your pet out of the way of other crafters!)
- Craft naked to minimize your power pool while maximizing your power regeneration.
- Don't use power Arts every round.
- Don't use power Arts at all.
See Also
| Parts of this page were originally a guide, located here, written by Calthine. |
| Allakhazam credits this post by DominoDev at the SOE Official Forums for some of the info in this article. |
|
