- Database
- Zones
- Kingdom of Sky
- The Laboratory of Lord Vyemm
The Laboratory of Lord Vyemm
| Level | 60 - 70 |
|---|---|
| Type | Instanced Indoor |
| Expansion | Kingdom of Sky |

|
| ||||||||||||
| ||||||||||||
Zone info
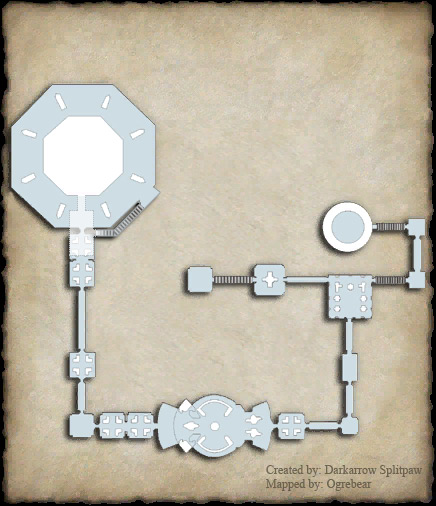
- This zone has no story like Spirit of the Lost or The Gates of Ahket Aken. There is only one line - kill all named. Every named drops one item (Fabled/Legendary) except for Lord Vyemm who drops two of them.
- Non-nameds are dropping no-trade armor in master chests with Relic prefix. These items can be turned in Solusek Eye into very nice fabled armor that is unique for every class.
- Re-entry:
- 5 days 20 hours in case you kill named
- It is very nice idea just go to this zone with 2+ groups for relic items hunt. It is possible to go there for relics every day. To do this just clearing non-named mobs in R1, R2, R3 and R4. It is possible also to clear R5 without killing named in R4. Just put one player out of raid. This player will pull Doomright Vakrizt and run to R3, R2 and whole raid force runs to corridor between R4 and R5 in meantime. Puller can be called by conjuror back to raid after.
Named
The Slavering Alzid
Location: R3
Level: 70x4
Health: 1.2M HP
Attack: Crush, Slash
AOE:
* Whirling Talons, Slashing, ~30s
* Stunning Howl
* Charm
* Fear
Note: Easy job with tank lvl 70 medium equipped (no T7 raid fabled loot), proper pull and jousted AOE. Be ready with Secondary Tank if MT gets charmed
+ 2x a Doomwing shackler
Health: 45k HP
Attack: Slash, Mental, Disease, short Duration Fear on tank
Note: Recommended to use bruiser tanks with closed mind ability
Doomright Vakrizt
Location: R4
Level: 68x4 - 70x4
Health: 820k HP
Attack: Crush, Slash
Specials: He cast pets that casts
AOE: Incinerating Fires of Doom
Note:
* Clear whole room before you pull him unless you want to fight 5 groups at once.
* Kill the two adds first.
* Probably the easiest mob in zone.
+ 2x a Doomwing reaver
Health: ??k HP
Attack: Crush, Slash
Specials: Barrage
Pardas Predd
Location: R5
Level: 71x4
Health: 860k HP
Attack: Pierce, Heat, Magic
AOE:
* Enthralling Flames, heat, ~40s
* Firestorm, heat, ~random - on all our fights he played it at the beginning and and in the middle of fight. Not enough data to calculate minimal period
* Single target magic nuke for about 5-6k dmg on non-magic buffed tank.
Specials: He summons two Ancient Bound Abomination in separate encounters when he reaches 55% health.
Strategy:
* He is roaming around the room. It is necessary to fight inside the room because encounter breaks if pulled outside to hallway.
* When he is on opposite side to entrance, raid rush into the room. Tank to the corner of room where he meets named, ranged fighters to adjacent corner.
* We do not joust AOE's. He goes down very quickly even with ranged fight.
* The main issue are summoned adds - place two tanks in center of room or one berserker with AE taunt. When adds spawn, offtanks taunt them quickly before they start to kill raid.
* Pull adds to opposite side of room as raid to avoid their barrage hitting people.
* Finish killing named, then switch to kill adds.
Ancient Bound Abomination
Health: 160k HP
Attack: Crush, Slash
Specials: Barrage
Doom Prophet Kin'vah, Doom Ravager Ru'ystad, Doom Reaver Cheyak
Location: R7 (This room and the area immediately before it casts a fear spell. Pull to R6 to avoid.)
Level: 71x4
Doom Prophet Kin'vah
Health: 370k HP
Attack: Crush, Divine
AOE: Vengeful Terror, divine
Doom Ravager Ru'ystad
Health: 340k HP
Attack: Slash, Cold, Heat
Note: The highest DPS out of these three. This mob mem wipes frequently.
Doom Reaver Cheyak
Health: 750k HP
Attack: Crush, Mental
AOE: Stunning Howl, mental, ~60s
Strategy
* We are using two tanks - one tanks nasty brigand Doom Ravager Ru'ystad and one tanks other two.
* Kill Doom Ravager Ru'ystad first than other two nameds.
* Another option is to use a Plane Shifted, Bolstered, Vehement Gem'ed Tellurian to pull the encounter. He'll eat most of the nasty stuff right off the top enabling one tank to hold the entire encounter. As always, kill the Ravager first.
The Uncaged Alzid
Location: R9
Level: 72x4
Health: 1.2M HP
Attack: Crush, Magic
AOE:
* Uncaged Stomp, crush, ~33
* Strike of Massive, crush,~26
* Primal Fear, fear, ~60s
Specials: Randomly summons one add that will split in two if not killed - mutagenic disgorgant
Note: He spawns in the center of room when whole room is cleared.
Strategy: Use two tanks: One to hold Alzid, the other to grab the mutagenic disgorgants when they spawn. Have all the dps assist the off-tank and immediately kill the mutagenic disgorgant otherwise it will split in two. The adds will continue to split in two indefinately so you have to take care of them right away.
+ mutagenic disgorgant
Level: 72+++
Immune: Cold
Attack: heat
Note: Mezzable
Uustalastus Xiterrax
Location: R11
Level: 72x4
Health: 680k HP
Attack: Crush, Mental
Note:
* Alternates between Magic and Melee immunities. Starts out immune to Melee, and around 50% will switch to immune to Magic. (Changes seem to be occur every 3-5 minutes.)
* It can be pulled to R10 (not a good idea, but doable).
* a deathless warden/warlock are mezzable
* Encounter adds have an AOE damage + knockback when they are killed. They will knock the MT high up into the air. Good strategy is to have the MT stand on the left side of the room with a small roof overhang so the MT does not go so high.
* Kill Adds first
+ 6x a deathless warden (There is a 50/50 mixture of wardens and warlocks, 6 total?)
Health: 20k HP
Attack: Crush, Cold
Doomsworn Zatrakh
Location: R13
Level: 73x4
Health: 1M HP
Attack: Pierce, Crush DOT, ~40s
AOE: Surging Blows, Crush
Note: DOT is arcane type and HAS TO be cured otherwise it blows on the last tick.
Strategy:
* Remove DoT immediately.
* Two tanks. One tanks one or both adds while other tanks named.
* Position adds away from named to avoid DoT while killing them.
* Kill adds first.
* Be warned that named has a harm touch like ability that can hit the MT for as much as 12k+. Be ready with secondary tank.
+ 2x a Doomsworn adept
Attack: Slash, Crush, Pierce
The Corsolander
Location: R14 - entrance to room
Level: 74x4
Health: 1.5M HP
Attack: Slash, Crush, Heat
AOE: AE physical knockback+stun long range. Can be resisted.
Special: Heat Damage shield, can not be removed, Raising resist does not help
Strategy:
* Don't melee - use only ranged weapons/spells/ca. Main tank should still melee and use CA's.
* Summoners should use their Mage pets
* Useful to have Paladin tank with Amends on high DPS caster
* Or use big aggro for MT group (Coercer, Dirge works best)
* Make sure that all the healers have essences + heart and lots of mana regen, because it could potentially be a very long fight.
Euktrzkai Amdaatk
Location: R14 - small room down the stairs
Level: 74x4
Health: 800k HP
Attack: Crush, Heat
AOE: Eye of Fire, heat, no timer measured - sometimes he casts it once per fight, sometimes he does not use this ability at all.
Note: Easy job if you've made it this far.
Lord Vyemm
Location: R14 - center of room
Level: 74x4
Health: 1.5M HP
Attack: Slash, Crush, Magic
AOE:
* Scream of Chaos, ~30s (around 48s when prolonged by swash/brigand Str 5 achievement), long range, crushing AE + Vertical knockback + Mem wipe. It is possible for mages to stay out of range (about 35m away from mob) so you can enter and leave AE zone.
* Tail Lash, rear facing cone, crushing AE, 60s (around 75s when prolonged by swash/brigand Str 5 achievement)
* Energy Vortex, Front facing cone, Magic, ~60s (around 75s when prolonged by swash/brigand Str 5 achievement)
Strategy:
* It is necesary to kill Lord Vyemm before Alzid Prime because killng nasty dragon first disables Alzid's healing buff and pulling Lord Vyemm alone is much easier than successfully pulling Alzid Prime alone.
* Fighting Lord Vyemm only is easy. We use a pet or monk to pull him to the room where Euktrzkai Amdaatk was killed. We left coercer upstairs overlooking the arena. Raid waits in the Euktrzkai Amdaatk room on the stairs leading to upper floor or they are behind the pillar. Pet pulls and carries dragon to MT, then MT tanks Vyemm in the corner on the far side of the room from the arena. Coercer uses Amnesia on Alzid Prime on pull.
* All melee raiders should position themselves at Vyemm's side to avoid Tail Lash and Energy Vortex cones.
* Energy Vortex has very long range - it is not hard to keep tank alive under this AOE - especially if swashs/brigands do their work and they increase AOE re-cast timers.
* Use arcane potion wards to minimalize unintended contact with Energy Vortex on pull and memwipes for all raid.
* Very important to get Magic resistance to at least 7k on MT. Energy Vortex hits for 7 - 11k and will outright kill a MT with poor Magic resistance.
* The vertical knockback is nasty and pretty much unavoidable. Find a room with low ceiling to fight in, especially important for MT. Euktrzkai Amdaatk's room works well. The more the MT moves, the more the mob moves and with so many AE's the mob needs to be held as still as possible. Be ready to move around as the mob moves.
* Lord Vyemm sometimes gets stuck in the ceiling so tank must drag him back out and raid must reposition quickly.
Another Strategy:
* The fight can easily be done with one tank tanking both Lord Vyemm and Alzid Prime. Have a Conjuror pet pull with a plane shifted pet from the back right corner of the eyeball room. The pet needs to be sent at Lord Vyemm and left there. Alzid will come in first and the tank needs to get a few taunts off on Alzid and no one else does anything to him other than debuff attack type abilities. When the pet dies Lord Vyemm will come running straight for the Conjuror and the tank needs to get a Rescue off as soon as Vyemm comes through the door way. At this point the tank should be in the front left corner of the room with both Vyemm and Alzid. Everyone needs to stay close to their healers so that when the AE goes off they get group heals. When you go flying in the air you need to stop attack for a few seconds so your tank can get agro back. If you get agro you need to run to the tank so that Vyemm doesn't use his frontal AoE on the raid. Once the tank is in the corner with Alzid Prime and Lord Vyemm you need to do as much DPS as possible on Lord Vyemm and burn him down.
* This can easily be done with 5-6 healers and only a semi decently equiped tank.
* The key points are to burn him as fast as possible and let the tank get agro back on mem wipe.
* This saves a lot of frustration on trying to split the mobs and get Alzid to reset. Once you know what you are doing you can kill them both first pull every time.
Alzid Prime
Location: R14 - center of room
Level: 74x4
Health: 750k HP
Attack: Slash
AOE: Alzid Prime does not have an AOE.
Strategy: Lord Vyemm must die first. Alzhid Prime has a buff on him which means he will heal just prior to death every time unless you kill Vyemm first. Once Vyemm is dead, Alzhid Prime is very easy to deal with.
Trash Mobs
* Doomwing Skarize Champion - Barrage + kick/stun
* Doomwing Forgewright - AOE Whirling Claw, ~30s & Hammerfist, ~28s
* Doomwing Ravager - Debilitate (huge mitig debuff)
* Doomwing Firedrake - Kick, Frontal AE
* Doomwing Ruiner - Debilitate
* Doomwing Endbringer - Debilitate
* Quellithulian Researcher - drains power of MT, Stifles MT (the monk ability Silent Palm)
* Terror Organ - Single target Knockback on MT
|